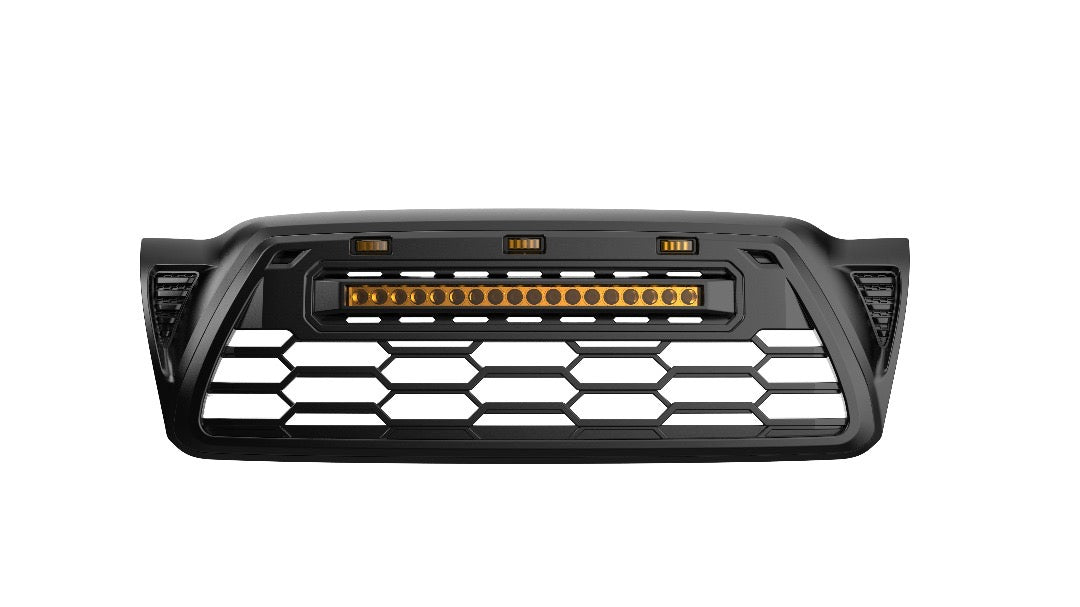


Why ours costs more than a bare Amazon grille
Most cheap grilles are a shell. You end up buying the rest piece by piece. Here's the honest difference.
- Shell only — no lights
- Buy the light bar separately
- Source your own wiring and harness
- Hunt down the right hardware
- Figure out the wiring yourself
- No support if something's off
- Grille + LED light bar included
- Triple amber raptor markers (optional)
- Weatherproof harness and relay in the box
- All mounting hardware included
- Designed to work together out of one box
- Lifetime support from a real person
Every factory sensor stays live — no covers, no workarounds
The Apex Pro is built around your truck's safety tech. Your radar, parking sensors, and front camera all keep working exactly like stock. Nothing is blocked, taped over, or disabled to make the grille fit.
Camera-equipped truck? A free camera bracket is included — it positions your factory front camera correctly behind the new grille, at no extra cost.
Don't have the Pro trim? You can still get the Pro look.
The Apex Pro fits every 2024+ Tacoma trim. You don't need to own a TRD Pro to run the front end of one — SR, SR5, TRD Sport, TRD Off-Road, and Limited all bolt right up.
Questions, answered straight
Where are the install instructions?
A full step-by-step is in the description above, and a printed copy ships in the box. Prefer to watch? Ask us and we'll send the install video walkthrough.
How does the wiring connect — which fuse?
The raptor markers tie into the INJ fuse using add-a-fuse taps (two are needed). The light bar runs to the battery with the included fused relay harness and an in-cab switch. Full steps are in the cheat sheet, and we'll walk you through it if you get stuck.
Will it fit my trim?
Yes — it fits all 2024+ Tacoma trims: SR, SR5, TRD Sport, TRD Off-Road, and Limited. Not sure? Text us your year, model, and trim and we'll confirm before you buy.
Will my safety sensors (TSS) still work?
Yes. Every factory sensor, radar, and camera keeps working like stock — nothing is covered or disabled. Camera-equipped trucks get a free camera bracket in the box.
Can I choose the light color?
Yes. Pick white beam for maximum forward visibility or yellow beam for better contrast in dust, rain, and fog. Amber raptor markers are optional too.
How hard is the install?
Plan on a focused 2-3 hours with basic hand tools. The grille drops into factory placement; the wiring is the involved part. We won't pretend it's a five-minute job — but a real person helps for the life of the product.
How fast do you ship?
Same-day dispatch on orders placed before 2 PM PT, Monday-Friday, from Reno, NV.
What if it doesn't fit or I'm not happy?
30-day no-hassle returns from delivery. Item must be in new condition with all hardware and packaging. Email us your order number and we'll send an RMA and prepaid label within one business day.
Same‑day dispatch on orders placed before 2 p.m. PT (M‑F) from Reno, NV.
Contiguous U.S. delivery: 3‑5 business days via UPS Ground or USPS Priority.
Tracking: An email + SMS with your tracking link goes out the moment the label is created; updates land in real time.
Injection‑molded ABS or OEM‑grade polycarbonate (heat‑ and UV‑stable to 150 °C).
30‑day window from delivery.
Item must be in new condition; include all hardware/packaging.
Start a return by email river.chiatovich@yotatribe.com with your order #.
We issue an RMA + prepaid label within 1 business day.
Exchanges ship the same day we scan your return—no downtime for your build.
Some manufacturers of our premium lighting—uses a Minimum Advertised Price (MAP) policy. Every authorized dealer (including us) has signed a contract promising not to sell those items below the MAP. If we break that agreement, we risk losing access to the product line altogether.
Discount codes will only work for all YOTATRIBE branded products.
⚠️ Disclaimer:
This product is not affiliated with, endorsed by, or manufactured by Toyota Motor Corporation. The terms "Toyota" “Tacoma,” "4Runner" “Tundra,” and “TRD” are used solely for fitment and compatibility purposes. All trademarks are the property of their respective owners.